Today – we’re going to take a look at how you can quickly, and easily set up abandoned cart recovery on your WooCommerce powered store using the FREE Cart Recovery for WordPress plugin:
Cart recovery for WordPress
Download for free now »
This guide walks you through how easy it is to set up an abandoned cart recovery campaign on a WooCommerce store. Watch the video – or step through the walkthrough / transcript below.
What do I mean by “Cart recovery”?
Well – if you shop online, at some point you’re sure to have come across an “abandoned cart” campaign. You add a product to your cart, but you don’t complete your purchase. Perhaps you’re shopping around for a better price, you want to check with your partner before you finalise the purchase, or maybe you just need some more information about the product. Some time later you receive an email from the store reminding you that you added some products to your cart, but didn’t complete your purchase.
These emails are great at getting people to finalise their order.
If you’re not tracking abandoned carts already you’re probably completely unaware of the sales that you’re missing out on. Even if you’re tracking goals that don’t complete in your analytics package – you still don’t have the information you need to follow up those sales.
Today – we’re going to look at how you can quickly and easily set up an abandoned cart recovery campaign on a WooCommerce store.
The Cart Recovery for WordPress plugin is a great way to get started with abandoned cart recovery, letting you set up automated recovery emails really simply. Not only that, but the core plugin is completely free.
Although we’re looking at WooCommerce today – the cart recovery plugin works with Easy Digital Downloads and WP e-Commerce as well.
We’re going to look at a test store for the purposes of this demo – but the process is the same for an established site, and the great news is that it will only take you a couple of minutes.
The first thing we’re going to do is install the Cart Recovery plugin. The plugin is available from the WordPress.org plugin repository – or you can grab a copy and register for updates on this site. As you can see, the plugin is completely free, you just need to provide your details and you’ll get a download link straight away. We’ll use a copy we’ve already downloaded.
We’ll head to our store – this is a demo install. It just has WooCommerce, the basic Storefront theme, and a single test product so we can show orders. We’ll log in and go the plugins page, install the plugin, and then activate it.
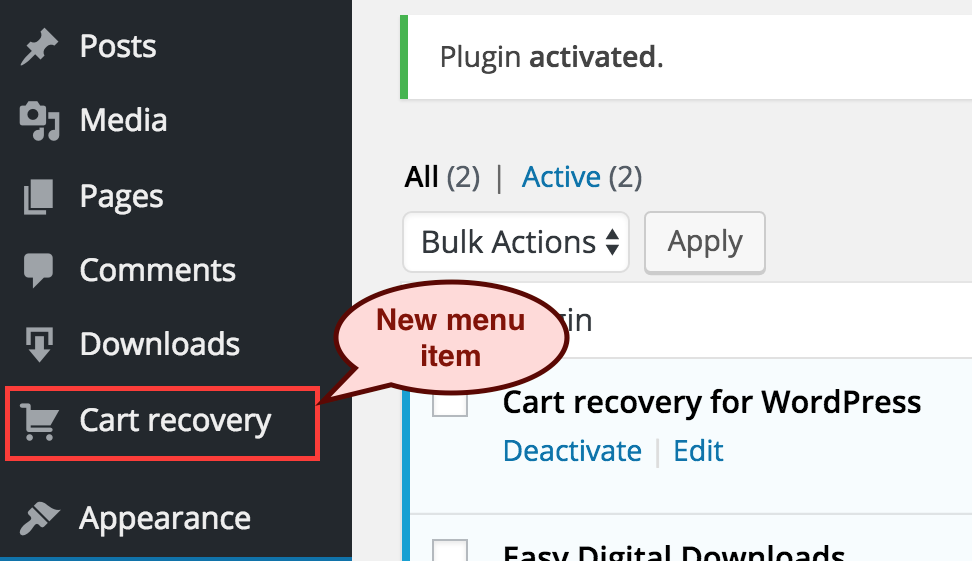
As soon as the plugin is active we’ll get a new menu item in the WordPress admin area. This holds everything to do with Cart recovery – let’s take a look.

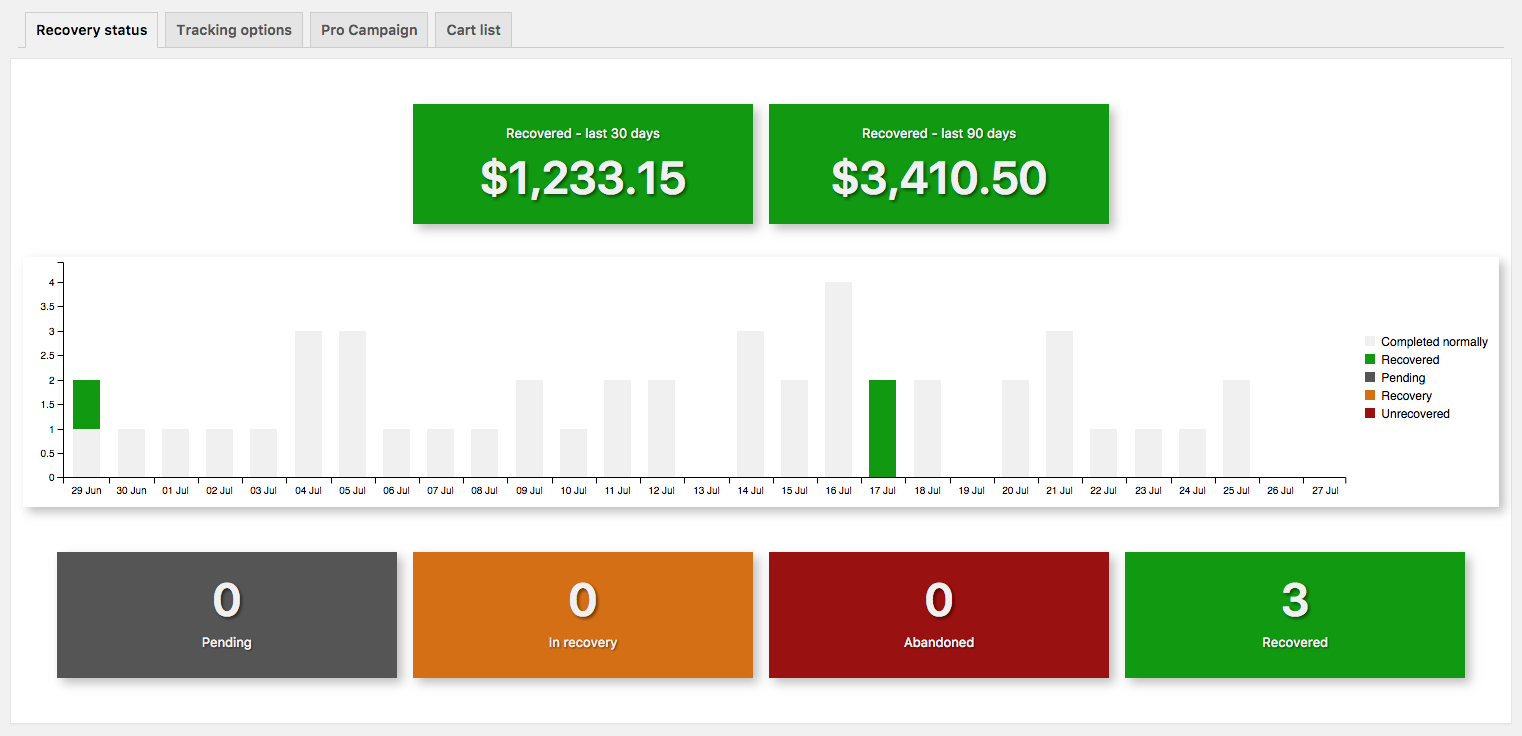
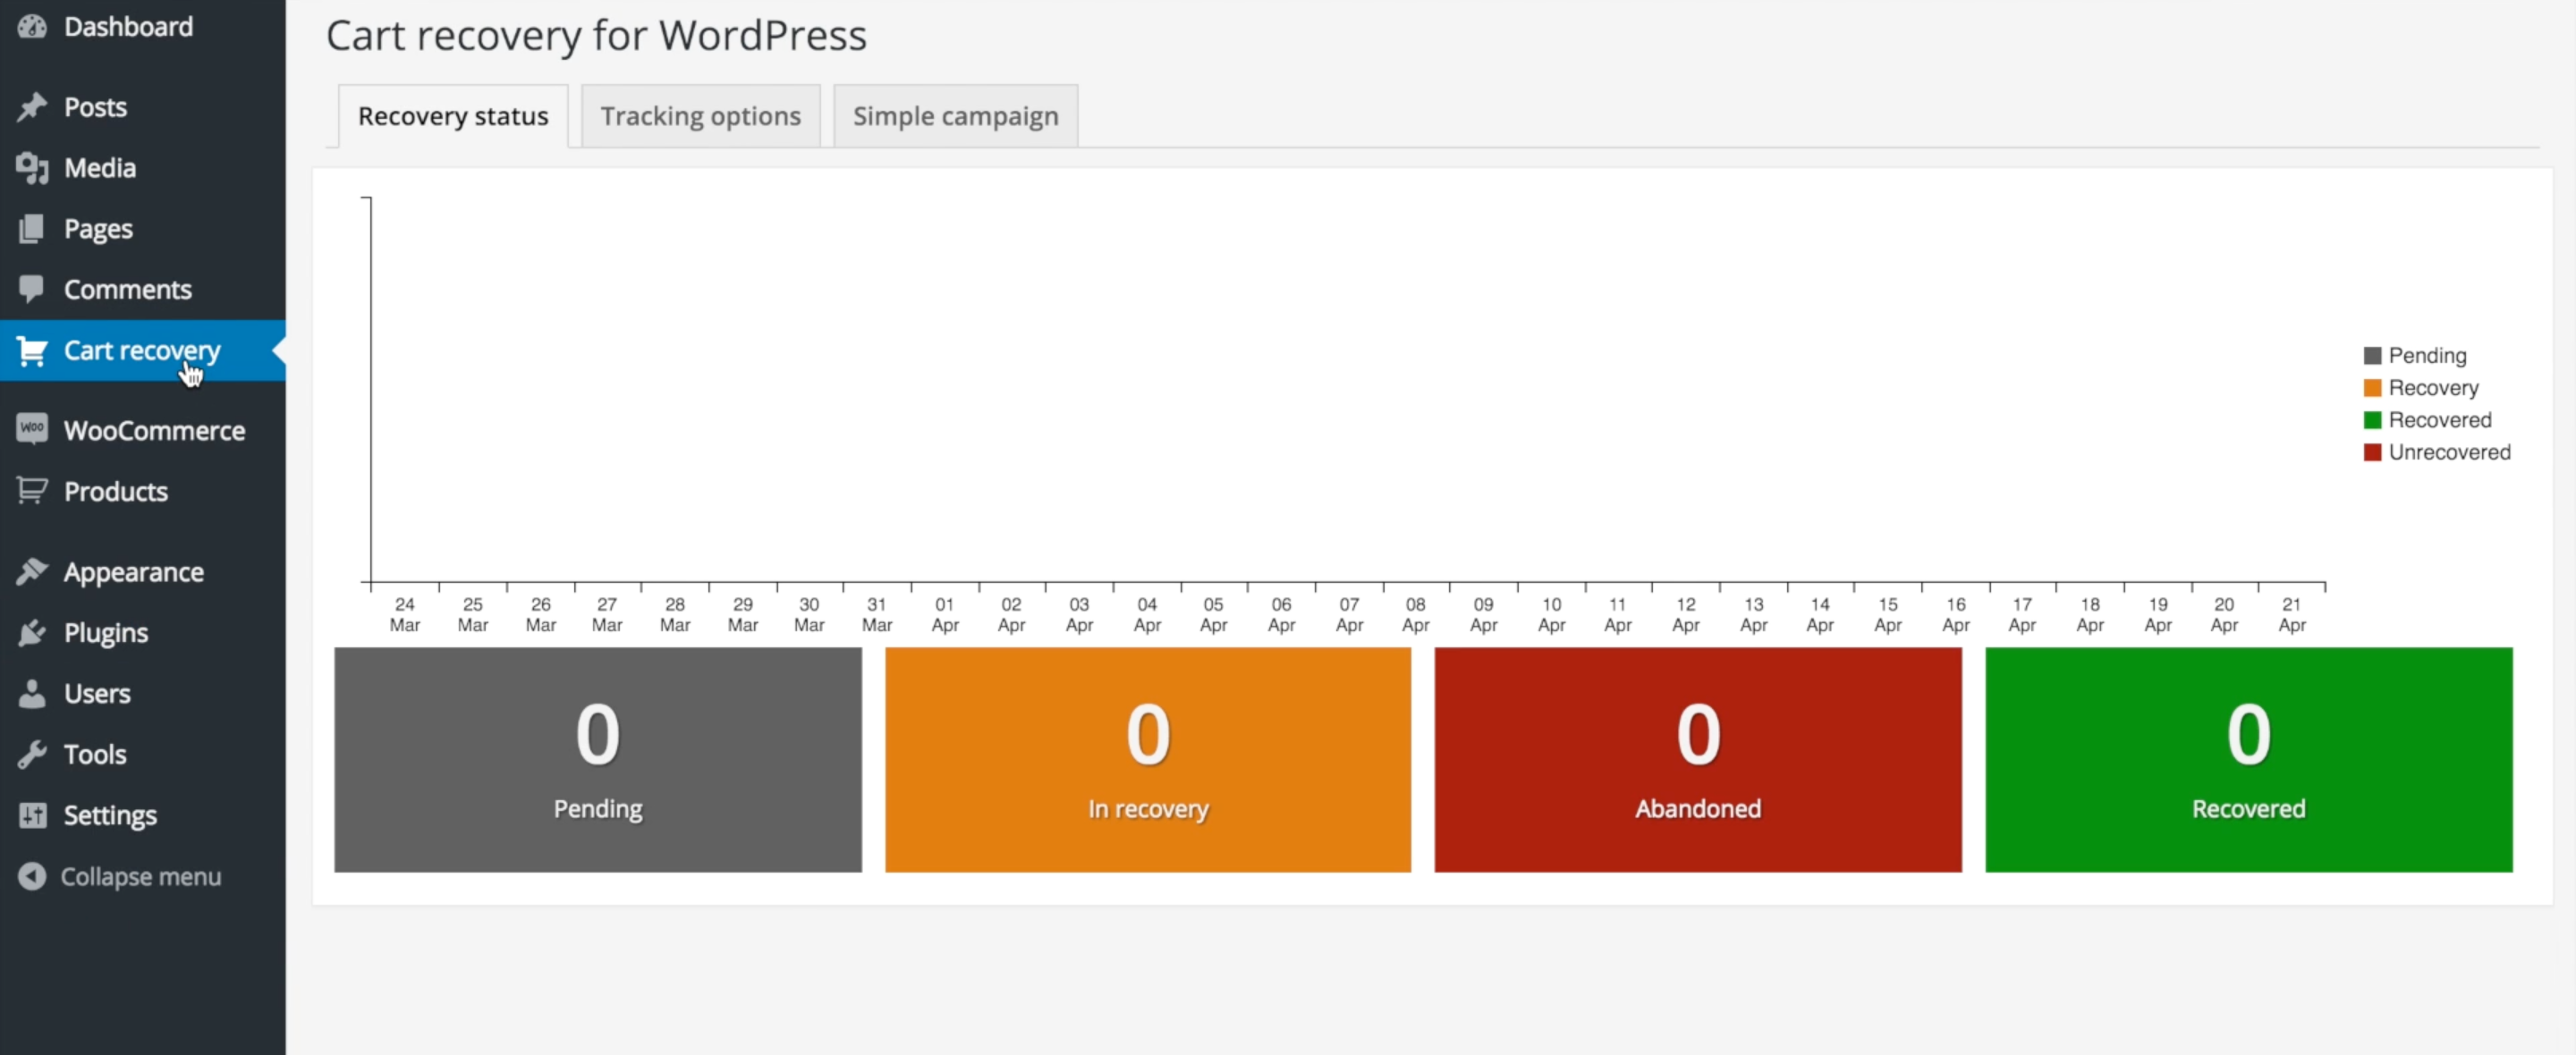
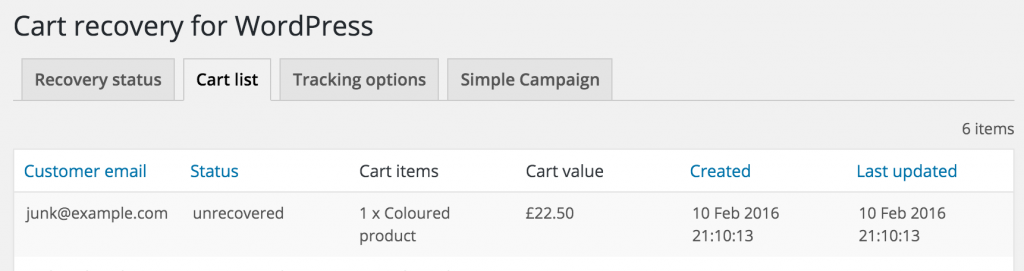
Main cart recovery status page
The main screen gives you a simple overview of carts that are “in recovery” on your site. It will show how many carts didn’t convert, how many did, and how many are still in progress. These are obviously all blank at the moment as this is a fresh install.
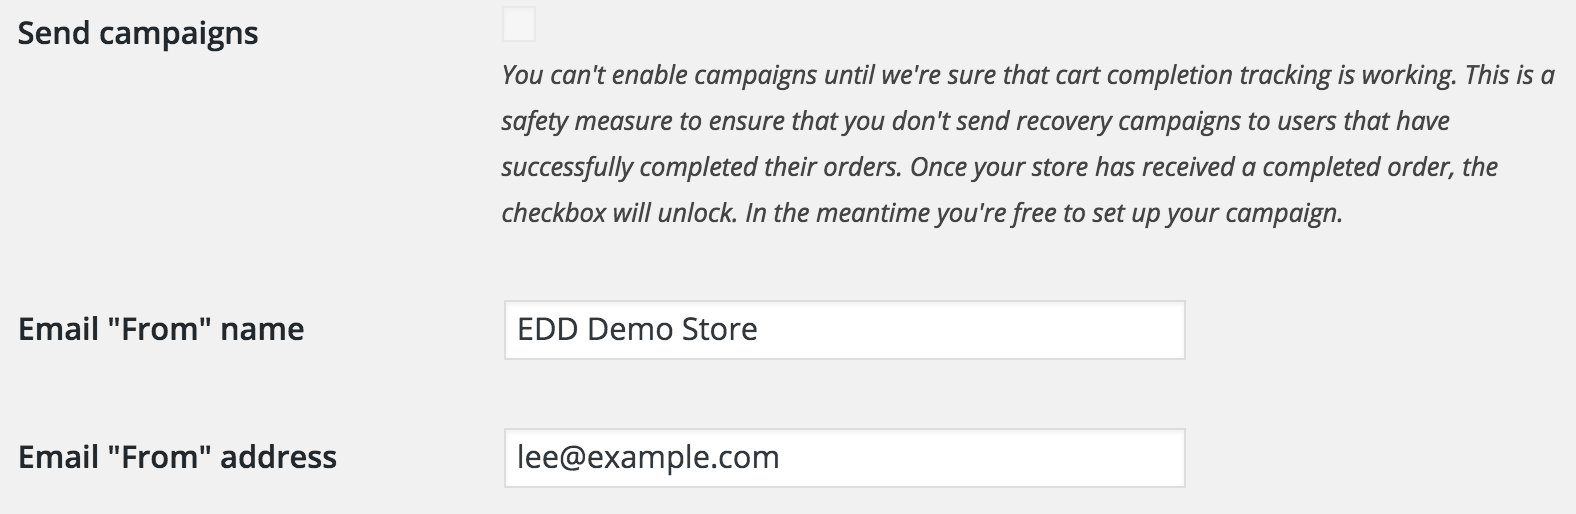
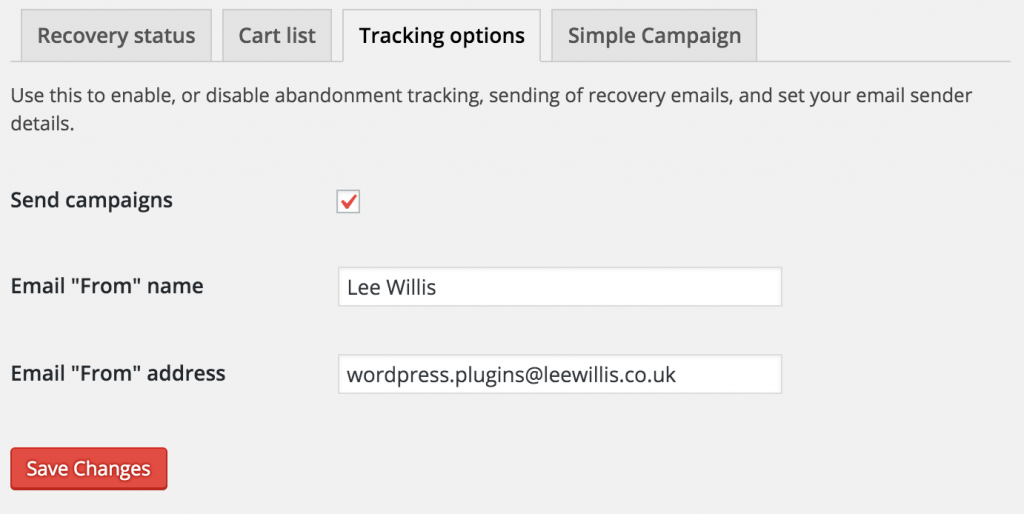
The next tab along is the main options. Here you can set the from address and name that will go on your emails . They’ll default in from the main WordPress settings – so we’ll leave them as is. Obviously you can change these if you need to. You’ll notice a checkbox on this screen that’s greyed out. This will be disabled initially until the plugin has had a chance to confirm that it can detect carts and successful orders and so you have a chance to set up your campaign. We’ll come back to this in a little while.
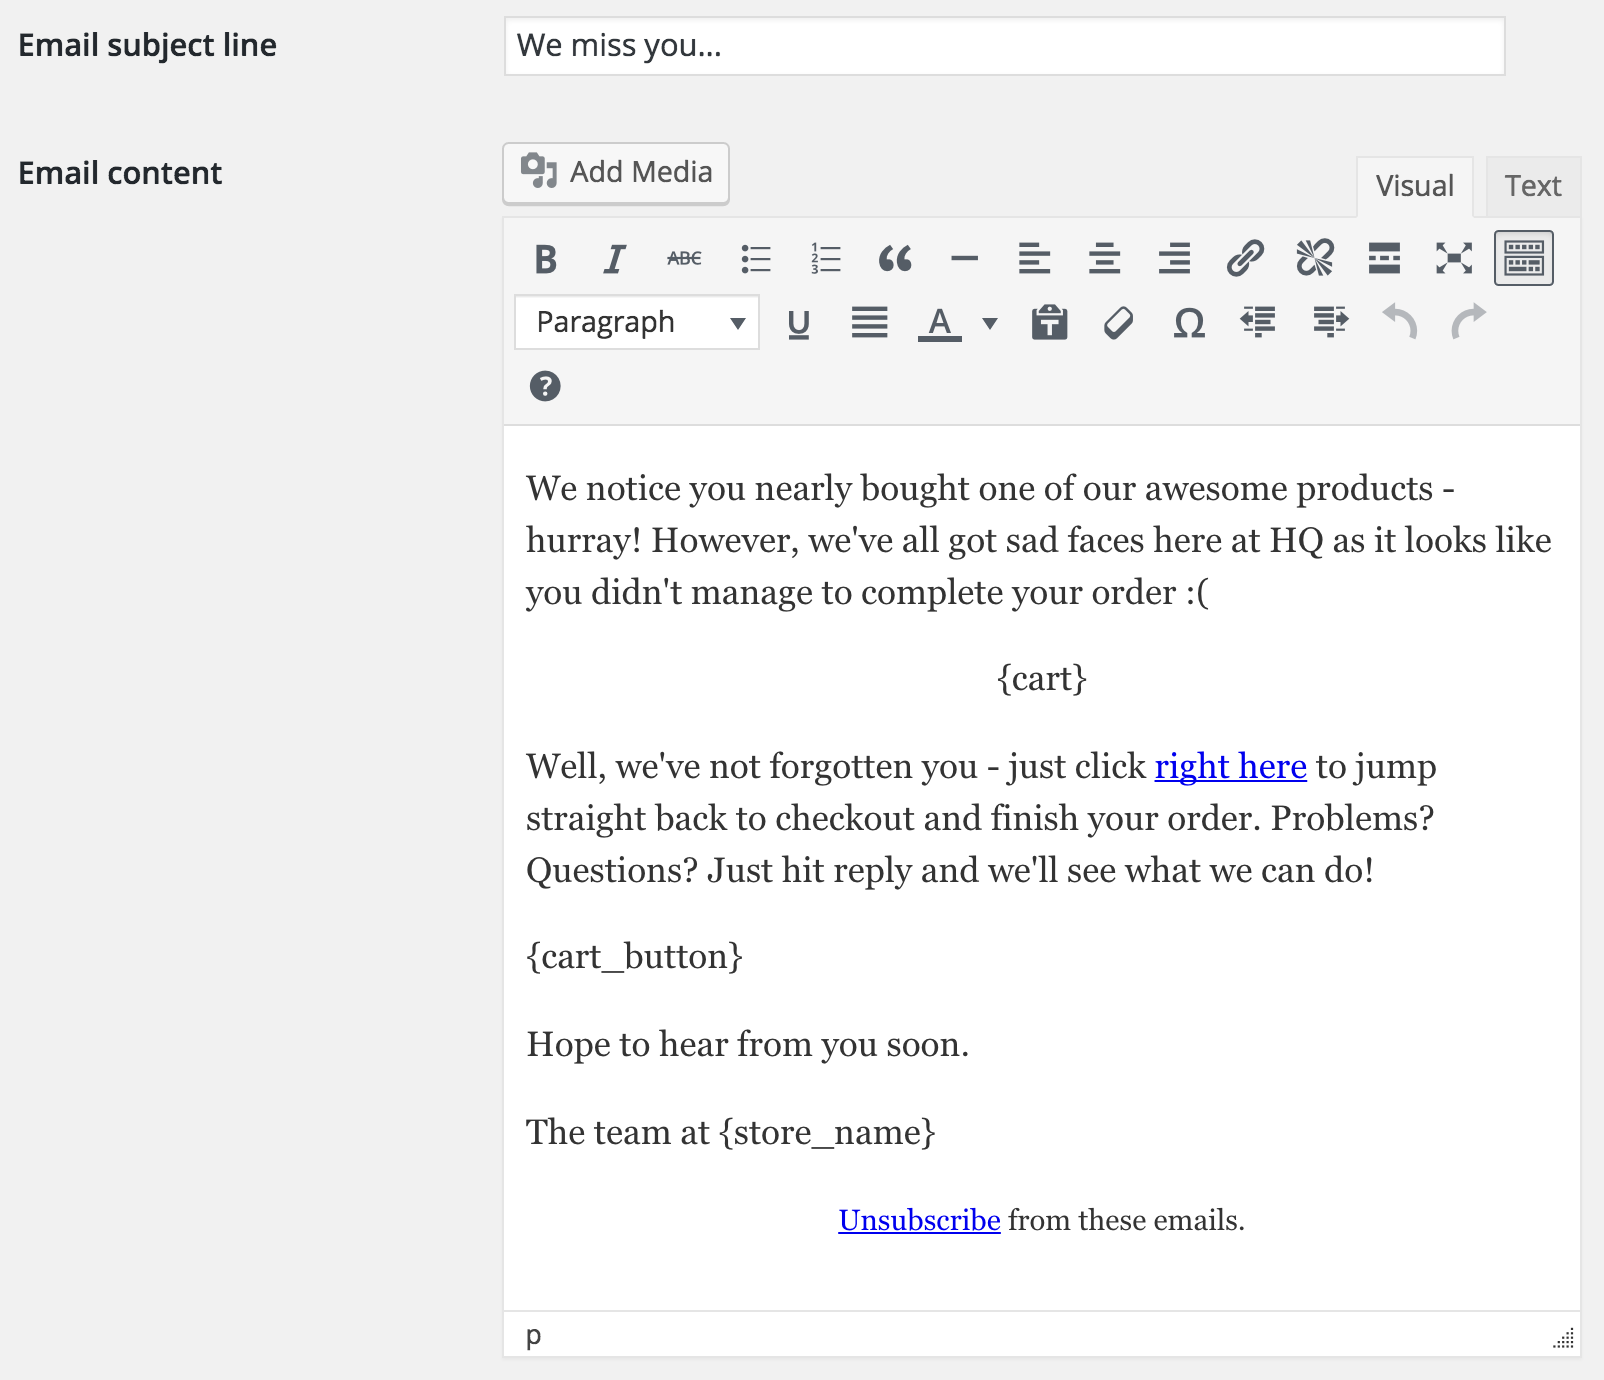
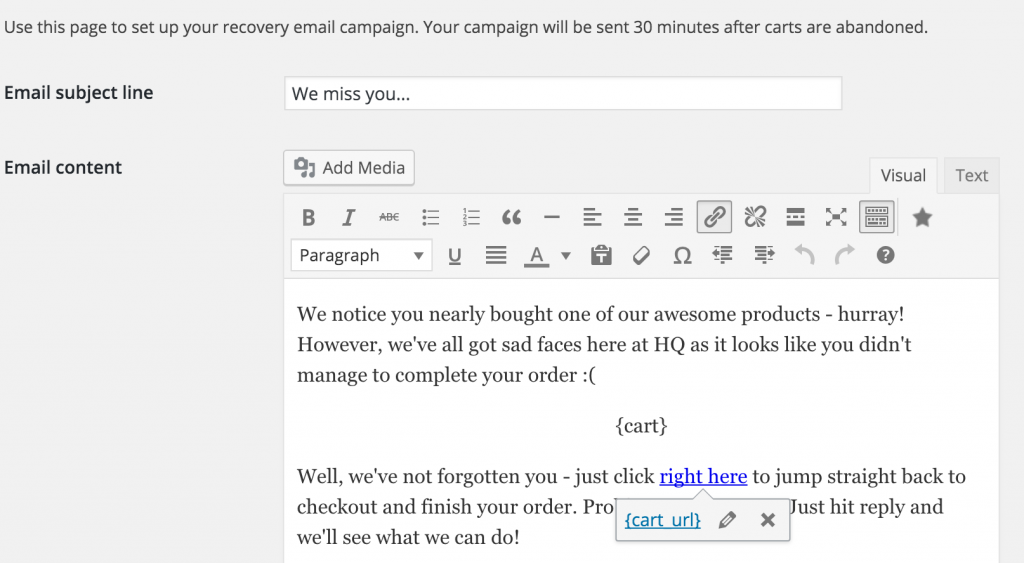
Email content admin page
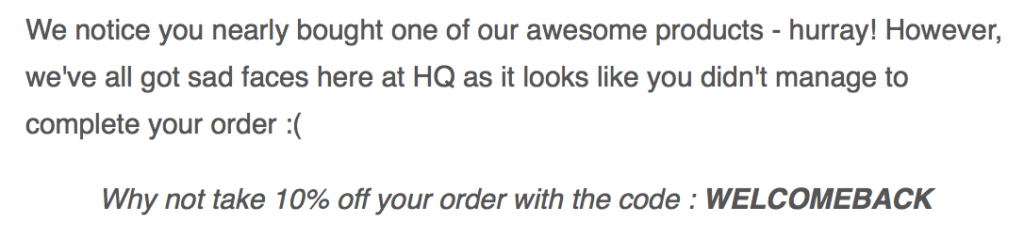
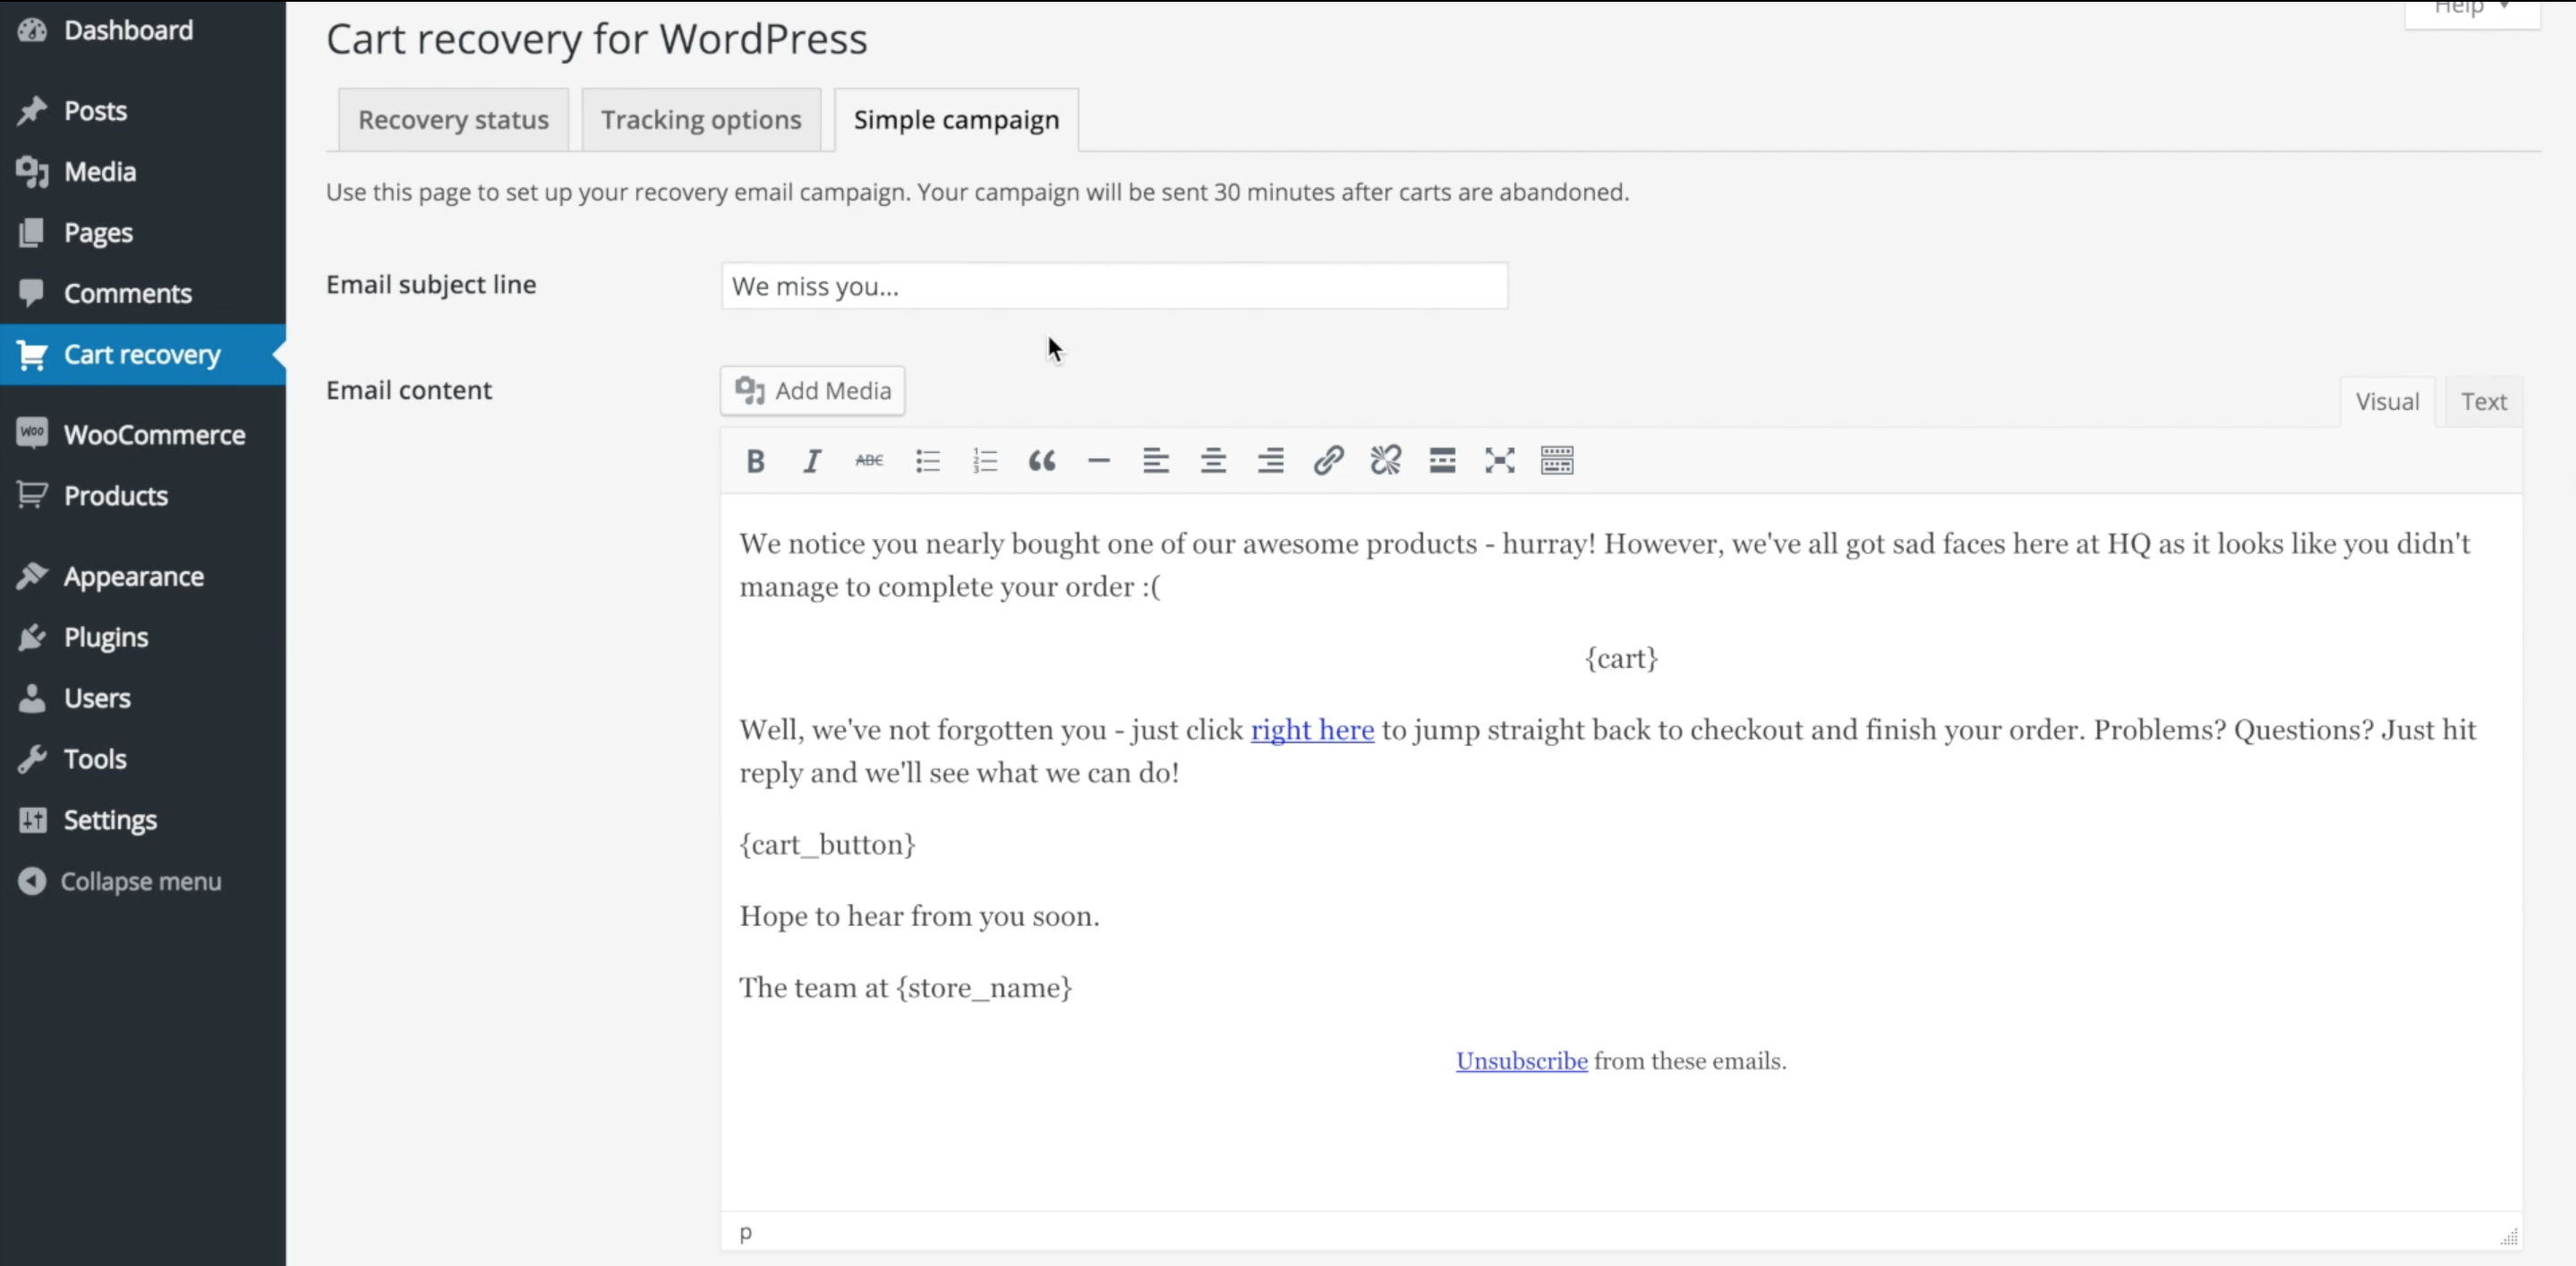
The final tab is the most interesting. This is where you set up the content for your recovery email. You can see that the plugin provides some default content – although you’re completely free to change it to suit your needs. You can choose the email subject, and the email content. The plugin will take of sending your email out to customers with abandoned carts – wrapped up in a nice, neat, HTML template. The email content contains a couple of replacement tags that can be used to populate customer information into each email as it goes out.
There are tags for the cart content itself so your customers will get a nice, neat table of what was in their basket. There are call to action buttons, and there are also tags for links so you can make whatever text, buttons or graphics you want into links back to the checkout.
So – we’ll head over to our store, and place a test order, so we can activate the campaign.
As we said we have a single test product, which we add to our basket, and head to checkout. We’ll enter some test details for the purposes of this demo. We’ve set the store up for cheque payment so we don’t have to provide payment. We’ll place our order and that’s it. That’s the order complete within WooCommerce – let’s have a look at the Cart recovery plugin.
There’s no real change on the first tab since our order completed normally. If we head over to the second tab now that a completed order has been received, the plugin will let us activate our campaign. Let’s do that. That’s it – the campaign is now active. Carts will be tracked, and emails sent out automatically. Let’s try it out.
We’ll head back to our test product, add it to our cart, and head over to checkout. We’re going to pretend to be a customer – so we’ll put in some test details. Now here’s where your customer might pause the process. Maybe they have a query about shipping prices, maybe they don’t have their payment details on them. So – they leave the process right there. Let’s have a look at what that looks like in Cart Recovery.
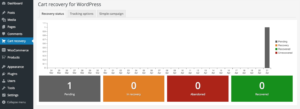
Status page showing pending cart.
On this first screen we can see that there’s a pending order underway. This is a cart that is in the process of going through checkout. It hasn’t been left long enough for the Cart Recovery plugin to say that it has been abandoned – but it’s in progress. For our real orders that complete normally – they will come and go from this screen. We don’t show normally completed orders here to avoid cluttering up the display.
However – if we just leave that basket, and don’t touch it, after 20 minutes, the plugin will put the cart into recovery. Let’s pause here, and check back in 20 minutes….
So – 20 minutes ago we left our cart in Pending status. The customer had started going through checkout but the system hadn’t yet established that they had left it and failed to complete. Here’s what we saw within Cart Recovery – we saw one pending cart sat there waiting. Twenty minutes have now passed, so let’s reload this screen and see what’s changed.
As expected, the cart has moved on from status Pending, into Recovery. That means that the plugin has identified that nothing has changed on that cart for twenty minutes, and it has decided that it should go through a recovery process. In a further thirty minutes time our campaign will actually go out. So – let’s pause here, and then take a look at that campaign when it goes out…
When we left off, our cart was in the recovery process. Thirty minutes after that the recovery campaign will get sent, so let’s have a look at what came through.
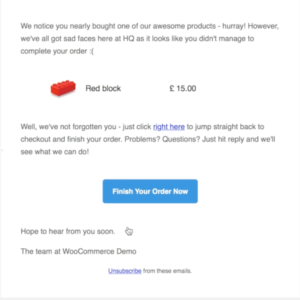
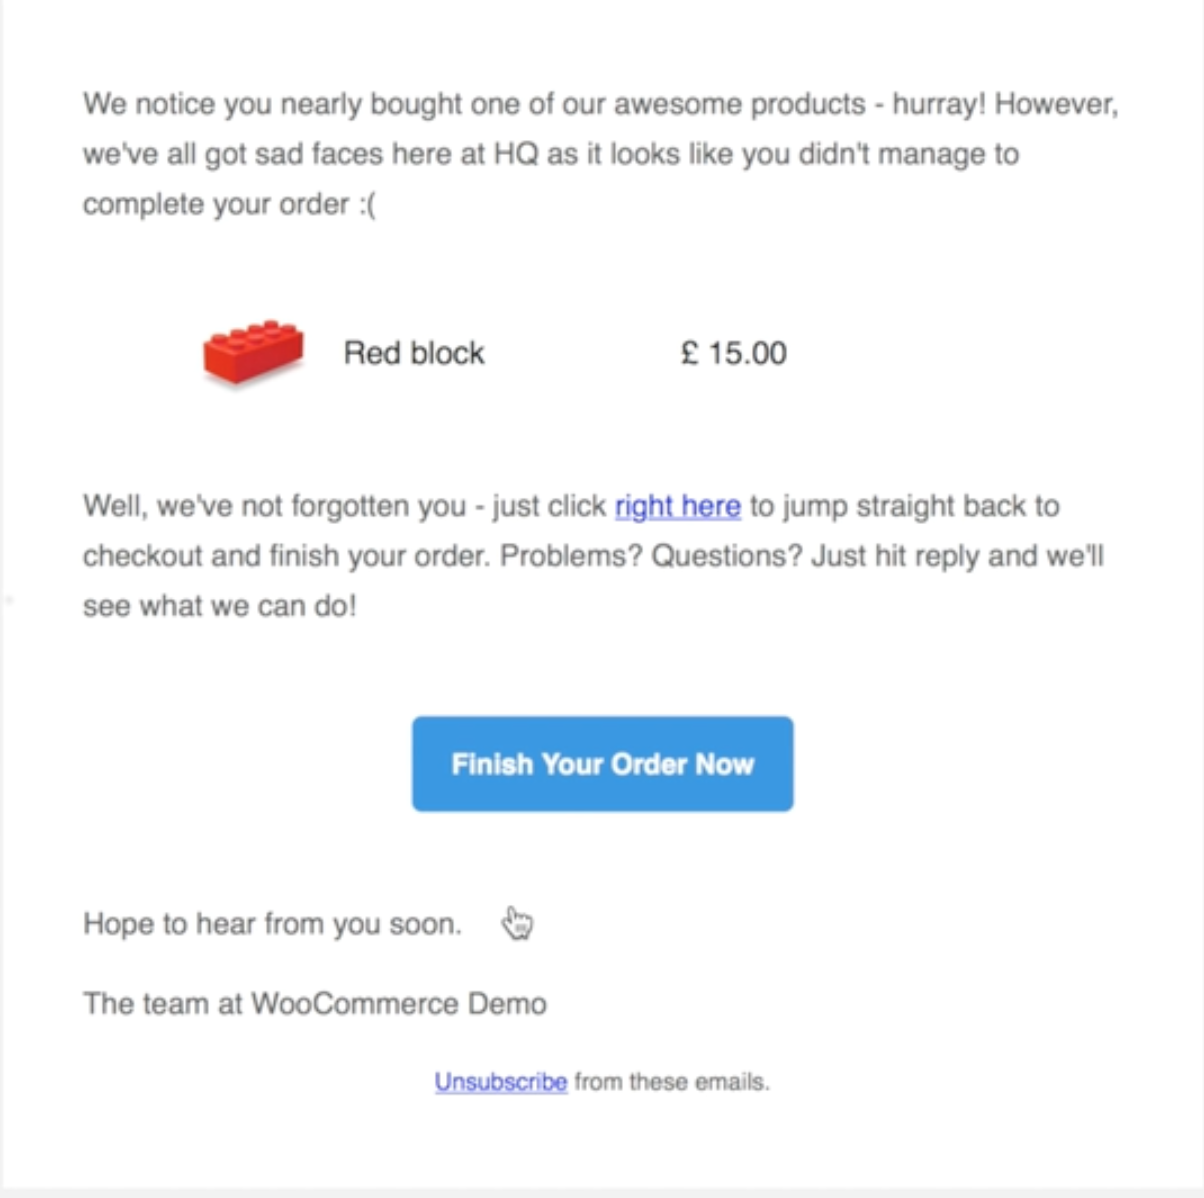
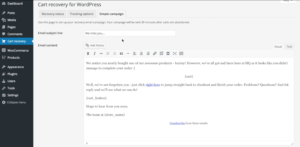
Cart recovery campaign email.
This is the email that got sent, you can see that it’s got our content that we set up in the admin area. What has also happened is that the replacement tags have been replaced with the actual customer information. The cart content has been replaced with this nice little breakdown of what was in the cart; the product image, the product name, and the price. All the information that the customer needs to remember what they were buying.
All of our links have been replaced with links back to the checkout process, including the call to action buttons. When the customer clicks through on those they get taken straight back to checkout, we’re not asking them to find their products again, or add them to the cart again – they’ve all been brought through, into the basket, into checkout straight away.
That’s a cart recovery campaign set up on WooCommerce. It probably took us about five minutes with a bit of explanation either side. It’s really east to try this out on your store. There are Pro add-ons available which give you more features, such as multiple emails, flexible email timing, and per-customer discount codes. If that’s something that interests you then check that out, but if you just want to give it a try, you can try the free version, maybe upgrade later – or just stick with the free version if that works for you.
Hope you get time to check it out.